
How to Setup Calix Router Port Forwarding?
The greatest networking gateway for digital devices to operate with a local network is the Calix router, which connects to the internet. With Calix router port forwarding, a single connection can be used to access the internet from several smart devices. In a similar vein, port forwarding is necessary to grant outside access to certain particular apps or services on the local network.
Furthermore, incoming internet traffic from a particular port to a device or service on the local network is controlled by port forwarding in a router. On the other hand, port forwarding is necessary for uninterrupted network access to a home server from a remote location, video conferences, and online gaming.
To put it briefly, the port forwarding Calix router feature is essential for setting up your router to let outside devices or services access particular local network apps or services. Similarly, this instruction will undoubtedly aid you if you need help with Port Forwarding on the Calix router.
What are the Essentials to Port Forward a Calix Router?
While you are thinking of beginning the process of port forwarding Calix router, then must gather a few of the essential equipment, like:

Internet Connection

Calix Router/Modem

IP Address

Admin Credentials

Ethernet Cable

Computer/Laptop
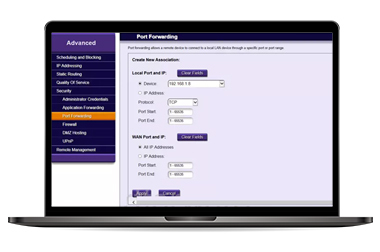
Configuring Calix Router Port Forwarding
Additionally, port forwarding on Calix router is essential to remotely access your devices. However, certain applications and services cannot function correctly if the incoming requests are not properly directed to the planned device.
Hence, port forwarding plays a vital role here. Similarly, port forwarding can be set up to ensure efficient and secure internet communication for your devices. Now, it is time to understand the steps for Calix router port forwarding. Let’s begin here:
- First and foremost, check that your Calix router is powered on.
- Further, connect the router network to the computer.
- Now, open the web browser and type 192.168.1.1 IP address.
- Hereon, a login window prompts you.
- Next, mention your admin username and password and press Login.
- Here, you visit the smart Home dashboard of the Calix router.
- The first task is to assign a Static IP to your WiFi router.
- Hence, tap on the DHCP Reservations and assign a static IP to your Calix router.
- Afterward, visit the Network” or “Advanced” section, as per the router model you have.
- Hereon, write the static IP address that you get initially.
- Next, click on the Port Forwarding option and select TCP / UDP on your router.
- After that, click on “Add New” or “Add” to generate a new rule.
- Afterward, mention a descriptive name for the port forward rule.
- If any section appears like “External IP addresses”, then write 0.0.0.0 in it.
- Make sure the “Enable” checkbox is marked if shown on your router.
- Now, tap on Save when you have finished the process.
- Lastly, you can test the port forwarding setup from your game server or an end application.
Why is Port Forwarding on the Calix Router Not Working?
Generally, several reasons are responsible for port forwarding not working on your Calix router. Likewise, it can occur due to inappropriate configuration or not offering the Static IP to the router. Sometimes, errors may arise if you leave or fill in inaccurate information in the External IP address section.
Similarly, a VPN, Firewall, or antivirus will also halt the port forwarding functionality. Here, we explore the easy-to-use solution to fix this error.
- Check the port forwarding settings on your router and reconfigure these if incorrect.
- Also, enter the accurate information in the External IP field.
- Check it and make the necessary changes to the VPN, Firewall, or antivirus software setting or disable them to carry out the Port forwarding process.
- Ensure that you have mentioned the accurate IP address.
- If issues continue, then reboot your router once. It will fix the temporary glitches.
- If none of the above-given methods work, then reset your router.
How to Fix Calix Router Port Forwarding Not Working?
Moreover, users occasionally get confused with the Calix router port forwarding process and face port forwarding failure and other glitches. Therefore, they need to follow the below-mentioned steps to fix the Port forwarding not working issues.
1. Type the Accurate Port Numbers
- Double-check that you’ve entered the right port numbers for your application or service.
- If they are incorrect, you can’t complete the process further.
- So, enter the accurate details.
2. Disable Firewall
- If the firewall is enabled, it conflicts with the router’s port forwarding settings.
- Ensure firewall rules permit traffic through the forwarded ports.
- If they do not, disable the Firewall for some time.
- You can enable it again after completing the procedure.
3. Fix the ISP Restrictions
- Some Internet Service Providers (ISPs) set restrictions on port forwarding.
- Or they impose carrier-grade NAT, which limits the ability to forward ports.
- Hence, contact your ISP authority to check and resolve if any restrictions are there.
4. Power Cycle Your Calix Router
- Now, power cycle your router.
- It fixes any temporary glitches.
- So, plugout the router, computer, and modem.
- Wait for at least 30 seconds and plug them back.
5. Reset the Calix Router
- If everything else fails, then perform a Calix router factory reset.
- Look for the reset button on the router.
- Press and hold it for a few seconds and then release.
- Finally, your router reverts to its default settings and you have to reconfigure it.
Final Thoughts
All in all, the Calix router is the most demanding networking device that can ease remote access to your smart devices, enhance networking speed, and prevent lags. Hence, Calix router port forwarding is essential to redirect the traffic to the specific device and ensure safe communication between the gadgets. You can check our post for the port forwardings and to troubleshoot the issues that occur during the procedure. Additionally, if port forwarding does not work, then walk through the solutions we mentioned above. Still, seeking further help? We are here, approach us on our website.